Welcome to W J O E RADIO, Taking radio from the past into the new Millennium!
![]()
General Electric: F-81, A large tombstone from 1933
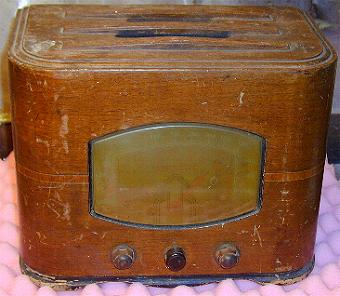
Unknown Model: A nice wood table set
Philco 57c: A Philco model from 1933
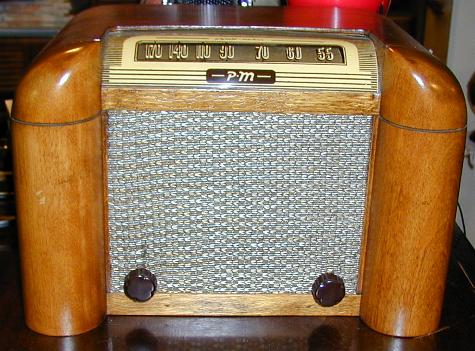
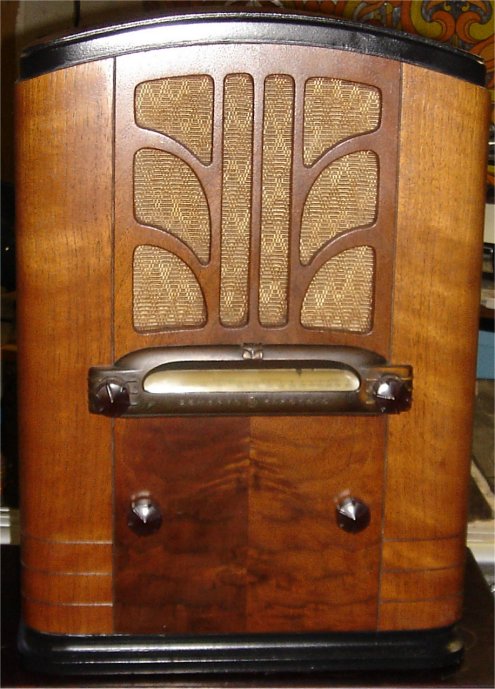
Plymold-Mectron MR-2: A Great looking table radio!!
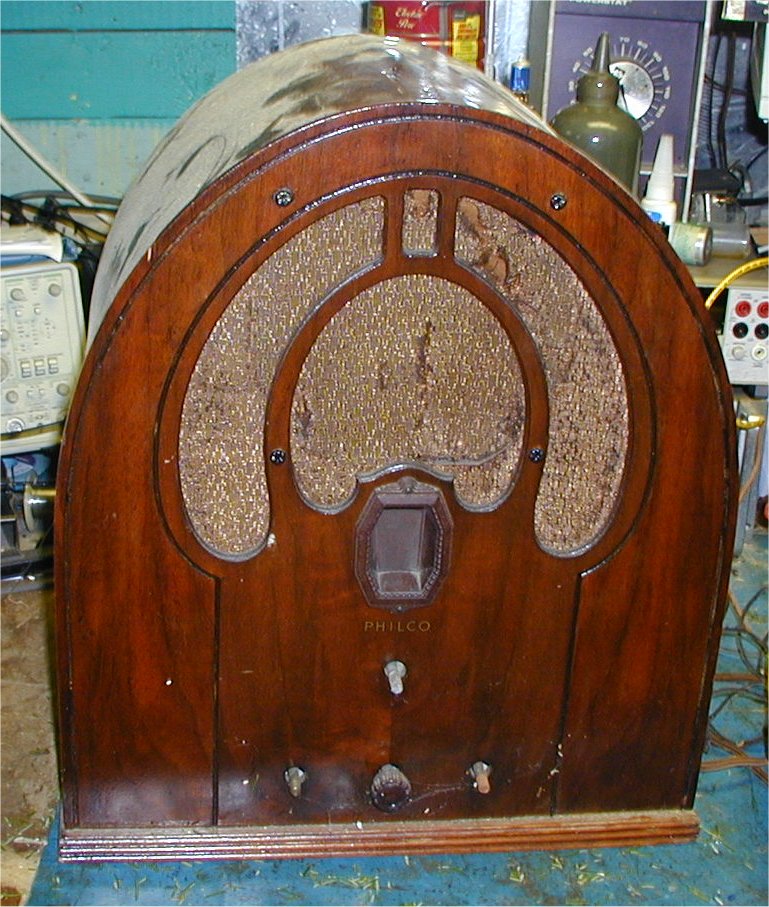
Philco 44: A thirties cathedral
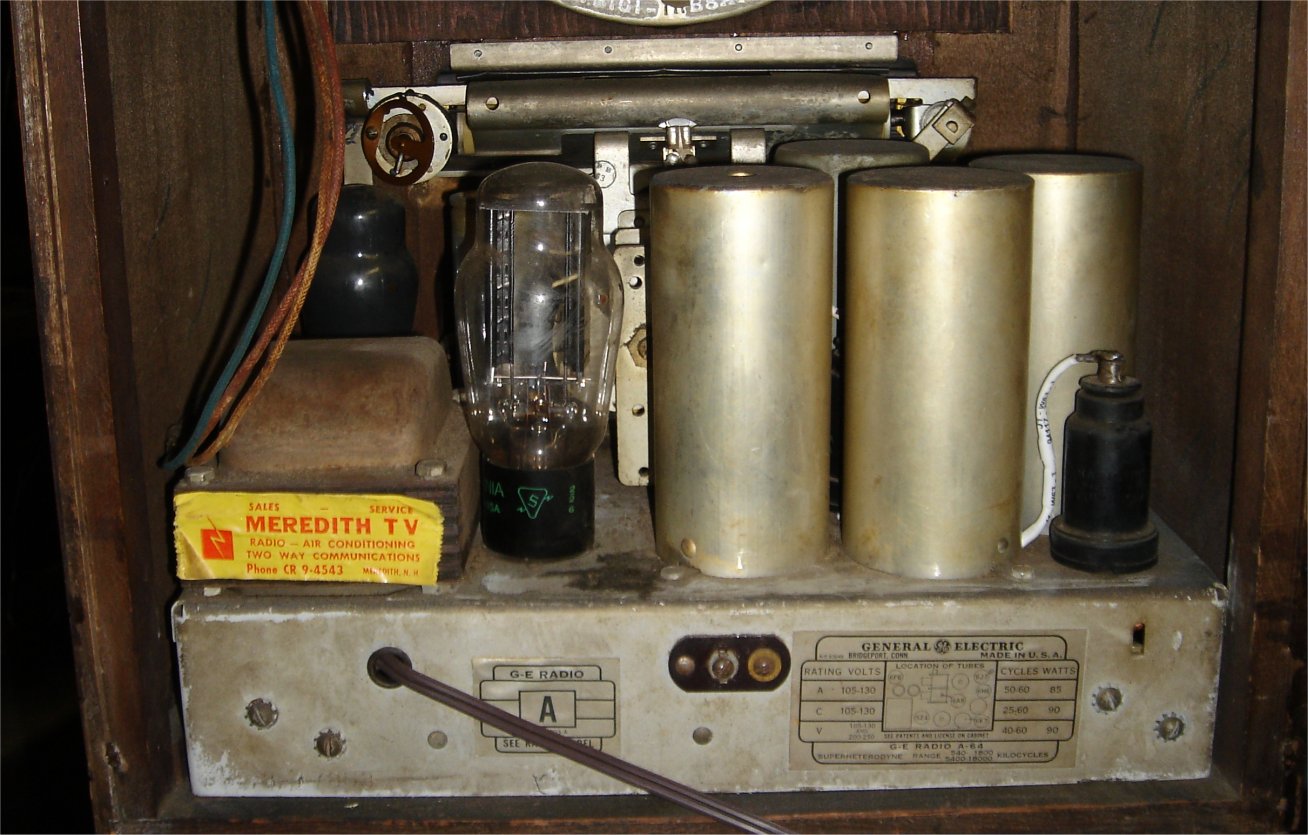
GE A-64: A beautiful tombstone with a robotic look
Westinghouse WR10-A: A great early tombstone
02/12/2k
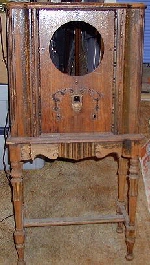
I have had this one for about 5 years now. She has been waiting for me patiently! I picked this up somewhere. I took it only because it was complete, an excellent start. especially when it has all that ornate designs intact. None of it is missing, take a look at the speaker grille!! WOW! The only thing really damaged is the top, as you can see. It has 4 or 5 chips in the veneer. Other than that she just needs to be refinished. I do have the chassis, and speaker. I repaired the chassis 4 years ago. I tried it out and except for a bit of distortion it sounded fine. I will go over it again. For now check out my Philco 57c I just finished below. Thanks to the person that e-mailed me about the model number. Until now this Philco was "unknown".
02/14/2k
I worked all weekend on this one. I got all the veneer repaired, and a small chunk of wood was missing on the middle front corner. NOT ANY MORE! I sanded and shaped all the repairs as well. I will probably start to strip it during the week, and update! For now I do have an action shot while it was being clamped and glued. ENJOY!
jpg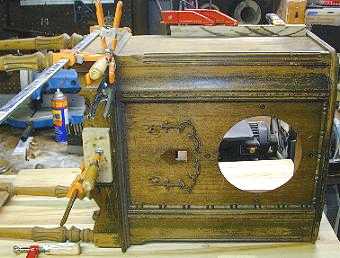
02/22/2k
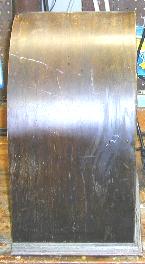
Take a look below! I finished the initial stripping and the top looks pretty good too. I will do a final stripping with #0000 steel wool and liquid stripper. I have to tell you though, this radio has a lot of scroll work on the legs and lots of details to clean up. My arm and my hand hurt from the work, so it may be a few days till I finish. Check out the pictures below.

03/03/2k
Well, well, well. I tried something new. I tried using that Minwax product called "Polyshades". What a mistake! Don't use that crap unless you have to. It is very difficult to spread evenly. It leaves dark areas, dries to fast so you can't stop for more than a few minutes in one spot. If you do it will paint over itself and leave a darker area where the paint overlapped. Anyway to late for me! It looks a bit fake as well, I guess it is. With a lot of touch up and some sanding I was able to make it come out pretty nice. I put a heavy coat of clear finish (satin) over it. Then I sanded it down with a 0000 piece of steel wool. Did a bit more touch up and sanding, then another coat! That's it for now , she has been sitting for a week, I need to let all the paint dry good and hard before I apply a final coat. I should be able to do that this weekend. Check the picture below! Taken just before the final coat!
03/06/2k
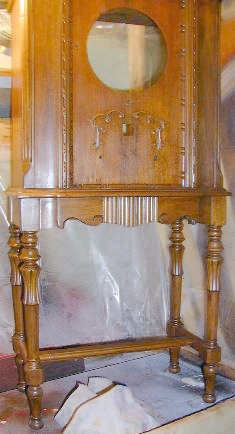
O.K after at least five years, she is done. Below is a picture NOW, next to a before picture! Let me know what you think.
BEFORE--AFTER
8/23/99
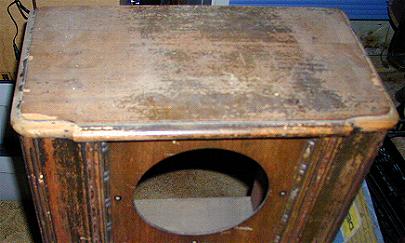
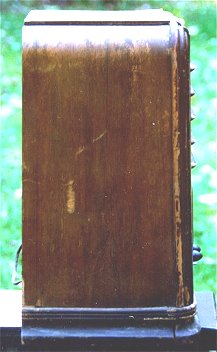
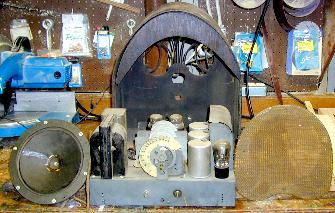
First of all I don't know the model number for this. I do have another one identical and it doesn't have a model number either. This one isn't to bad. The top of the radio looks to be in three pieces. Also right in the middle there is a small piece of wood missing. I do have the original knobs and dial plate. Also the chassis works! The cord was replaced by someone else and the chassis needs nothing, except a speaker. The speaker as well as the grill cloth was destroyed.
8/24/99
I had a lot of spare time the last couple days, so I reconned the speaker. As luck would have it, I had an identical speaker with a bad field coil and a good cone. Well now I have a one with a good field coil, and a good cone. Now it plays well and sounds good.
11/22/99
I haven't done to much in the last couple months. I have been busy with the Philco 20 as well as other things in life. Check back and I will update.
12/23/99
I still haven't done to much, but took some time off during the holidays. I did start to pull it apart, because of the top piece. It is in two sections and need to be glued. The only way to do this is to take it apart first and start over.
01/22/2k
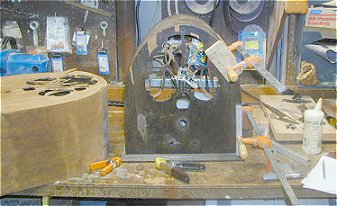
Well, well, well. You will never guess what happened when I tried to take the top apart! Yes it broke into five pieces. With a couple tiny pieces as well. Needless to say I had to glue and set each peirce one at a time every 24 hours. Using glue and wood dust i was able to cover the cracks pretty good. I next had to replace the chunk of wood missing. I took a piece from the bottom of cover from the inside. This way you can't tell unless your inside the set. I groved the top, then shaped and glued in the new piece. A bit of sanding, and shaving molded it into place very well. You could never tell it was done. The wood used for the repair matched perfect because it was from the same piece.
01/26/2k
I finished up the cover piece and reconstructed the cabinet. It didn't quite fit, so I improvise! An expert may be able to see what I done. However it doesn't make a physical difference in the appearance. Now comes the stripping of the finish. Not to bad though. This does have lots of hard to reach places and little detailed areas to get into.
02/11/2k
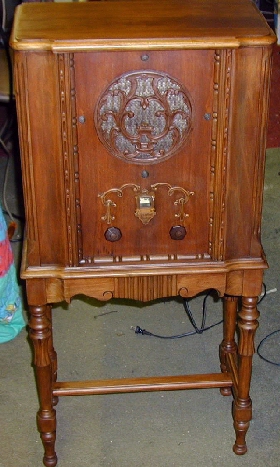
I finished the project. I put on many coats of a spray on lacquer finish. I do have to say, out of all the cracks and missing pieces, it came out OK! One part of one crack did come back. The top ended up being in six pieces, and some of those had tiny pieces missing/broken as well. I didn't have the grille cloth I wanted to use. I will replace it some time soon with a more appropriate piece in the future. I will include a picture in my next update! And I will add pictures for my next project. It will be a tombstone type on legs. I don't know what to call it. It looks like a small console with long legs. You tell me, I will post pictures with the next update.
02/12/2k
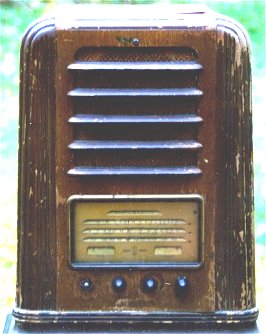
Well I got the picture. She is finished!!! I would like to thank the person that sent me e-mail identifying this radio. I don't remember who you are. SORRY! If you want me to credit you then e-mail me again. Until now this radio has been listed as unknown. It is a model 57c, made in 1933.


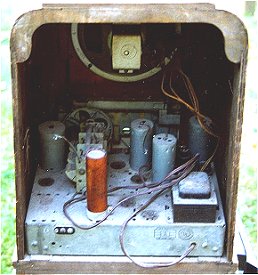
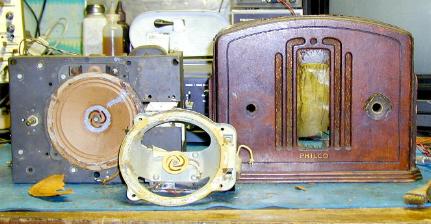
This is a G.E f-81 Tombstone Radio. It is missing five tubes, and has lots of veneer damage. Most of the damage is on the top. That I think I will replace. There is a scratch that went through the side. That will need a bit of attention! Also lots of other abrasions, and the bottom seems to be coming off.
WOW! What a mess. Do you think $45.00 "AMERICAN" was to much to pay for this one?
NOW FOR THE GOOD POINTS
All the knobs are present and good, the faceplate and dial plate are good.Nothing other than tubes, are missing. And the chassis is complete.
I have recently purchased the missing tubes. Some new some used at the NEARC radio show in Nashua N.H.
UPDATE 11/03/98
I took apart the radio, removing the chassis. I installed the new tubes and a new cord then slowly powered it up. Everything lit up, no smoke or noises. I noticed a nest when I first pulled the unit apart , but I didn't notice the coil that was chewed up. Lucky thing this was a coil with hundreds of windings and only a couple windings were chewed. This made it easier to repair the coil. I repaired the coil and still nothing! I then checked the caps and resistors. I ended up replacing three caps and two resistors, but still nothing! Now time for the signal tracer. After about an hour I found a bad tube, this is a preamp tube it has good audio going in and nothing coming out. I don't have one so I will order it and update again.
11/11/98
I got the tube I needed and it worked! But not so great. The sensitivity was very low and the sound was a bit distorted. After replacing a few more resistors and caps the reception and sound got better. I have also been working on the case. I repaired the hole in one side, and as I write,, the veneer that was coming away from the wood is setting. The radio looks like a robot with all those clamps. I had to cut a piece out because someone had tried to glue it once before but didn't clamp or anything. So I had to get the old glue out before I reglued or that part would have stuck up above the rest of the veneer.
11/23/98
The cabinet has been stripped and sanded, then sanded again, then some sanding. You get the message. You might say lots of sanding was required. I now had some more veneer repairs, small pieces and some loose. Now time for some sanding.
11/30/98
I gave it a sealer coat from a spray can then lightly sanded it and sprayed another coat. I then used a #0000 piece of steel wool on it, cleaned up all the loose paint dust. It was now ready for the finish coats. I used a semi clear polyurethane spray pain. I sprayed three coats, with a light sanding, buffing, and cleaning with steel wool between coats.
12/05/98
All and all not bad. I like natural wood so the only thing I didn't do was the darker panels. I left them natural and stained it all with the same color. The chassis went in without a hitch and both dial lights were replaced as well as the grill cloth. The original looked good until I tried to take it off, you get the point! I may try a different style of grill cloth, but other than that she looks good.
Completed
Not bad!! I like to leave the natural wood, so I tend to use a light stain and keep the wood look. I also never refinish brass pieces I like them natural as well.
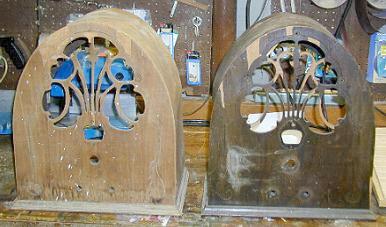
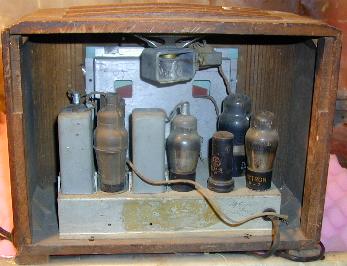
A bit rough, but repairable. I started to take it apart before I could get a picture. What you see is two of them. I bought them both from the same person. The lighter one is for scrap only. I wanted the veneer to repair the other one with. I figure it's the same veneer from the same period and should match up great. I don't however have the knobs. Do you? I do have the brass plate for the dial, and two chassis. One is rusted and the speaker is missing. As well as some of the tubes. The other chassis is clean and complete. A couple good things though, the tube shield is there, and all but two #74 tubes are the balloon type, and look nice in a 1930 set. Also the original grill cloth is good.
08/21/99
I repaired the chassis, and as you can see the speaker. I did an initial inspection and found everything was in place and looked good. The original cord is good also. The speaker was coming apart at the seam, but the cone was perfect. At first power up it did nothing. With further probing I found the B+ voltage was very low for a set this old. It was about 170 volts. I found a shorted cap was bringing down the voltage. I then started to get a low broken up signal. A couple more caps were replaced. Now I had some volume and good selectivity, but I could only move the volume about half way before I got loud annoying sounds. I then found an open 500K resistor. Now all is GOOD. A bit of cleaning and I will be done with the insides!
09/02/99
As you could see, I started to repair the case. So far just glue and water. The grill work is pretty damaged. Mostly separating between the wood layers. When all the layers are glued then I will need to re-glue the whole case. It is separating every where. Then I will need to work on the veneer. This will be a slow process, because it will be glued in segments and need to dry 24 hours between.
09/19/99
All the veneer work is done. Now I need to do some shaping, sanding, and filling. I will update with a picture when all this is done. I now have a solid one piece of grille and veneer. My next project will glue the cabinet again as a whole. I did find some loose layers in the grille work as I was working on it. So a bit more gluing, clamping, and shaping is needed.
09/23/99
With the kind of damage this thing had I'm surprised it came out this good. As you could see by all the clamps I started gluing the case. The next steps will be stripping and refinishing. By the way I still need knobs. If you have them please contact me.
11/16/99
It's been a while, but I started the refinishing process. I didn't like how one of the veneer pieces looked. I used many coats of stain to try and hide the color differences. For the most part it looks OK. I found some more loose layers of wood. I spent the weekend sanding, filling, filing, and painting the grillwork. After that was repaired I painted the inside edges black. I then put the first heavy coat of clear varnish. I will next have to sand it with a 120 grit sandpaper and put on another coat, but with a thinner varnish. That's it for now I will update again.
11/22/99
Hello, again. I put a heavy coat of varnish on and let it dry. I sanded it with a 120 grit sandpaper. I next mixed up a thinner varnish and painted on another coat. I found a couple small blemishes and fixed them by blending in paint and stains. I sanded the second coat again to level off the finish. With all the rebuilding I had to do, it isn't quite level enough. Tonight I will put on another heavy coat. I will sand it with a sanding block to get it as smooth and as straight as possible. The problem is only with the face of the radio.
12/15/99
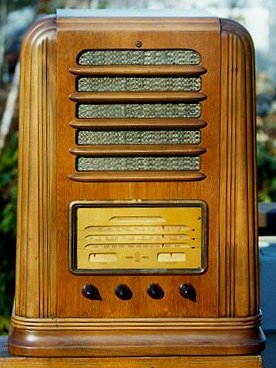
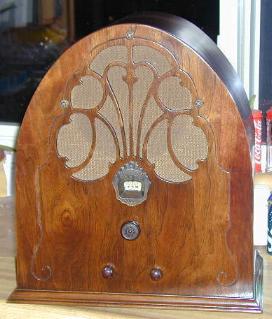
I finally finished the set. I used 6 coats of varnish with sanding to get a deep rich look. All and all I give it an 7-8 on a scale of 10. Check photo below and you tell me. It works great, looks and feels great while playing. (if you know what I mean). A nice set to have. ENJOY!
Well this time I have three new projects! It has been a while, but I bought three radios in the last couple weeks. Between Flea Markets, and the NEARC Radio Show, I couldn't help myself.
05/16/00
Well here is a radio I never heard of! "Plymold-Mectron". Please let me know what this is. It is made of wood, has two beautiful pillar like ends. It is missing both knobs, and one tube. I don't know the model number, so I will have to try and figure out what tube it needs. As you can see I already removed the chassis, and it needs to be refinished. You can't tell by the picture but, it has great veneer under all that aged finish! This will make one hell of a radio when done.
01/01/01
It's been a while for this one, but I did strip out the chassis, face plate, and grille. It all came apart relatively easy. I have had a lot of time and days off with all these holidays. Although I didn't find a schematic for this one, I was able to repair it. With a bit of math and a reference book, I was able to figure out what the missing tube was. The math told me what the voltage for the filament should be. "50" was the magic number. Looking up the other tubes told me what they did electronically. The reasonable deduction of course was to figure out what was missing. That turned out to be the diode used in the main power supply. A 50A5 Tube. After inserting the tube I got a very loud hum! Wonder what that can be? YES, the filter caps were bad. Although only one was bad, I replaced all three. Works great now! I also replaced the bulbs for the dial lights.
01/03/01
I stripped the case, only to find out the pillars were not veneer as they looked. They were painted on. I don't know what they used on this one for Varnish, but it did not want to come off. It took a couple days to get it stripped and ready for the next step. I will have to leave the pillars as they are. At least they are solid wood, and look good as they are. I also had to replace the grille cloth as well, as you can see.
01/06/01
Well, after some sanding and finishing work it was ready for stain. As well as new coat of Varnish. Looks pretty good now. Well a lot better anyway! Although simple it has a very nice deco look to it, as well as a good sounding set. Check out the picture below!
01/09/01
I received an e-mail with information about this set from a person that saw my web site, Curt. It is a Plymold-Mectron, not Mectrox as I thought. It certainly looks like an "x", but with a careful inspection it is an "N". As Curt put it, "it is easy to misinterpret". Curt also told me the Model number is MR-2. He also told me that the cabinet was made by Plymold, and the chassis was made by Mectron. Well, I got one thing to say about all this! THANKS for the Info Curt!!!!!
05/16/00
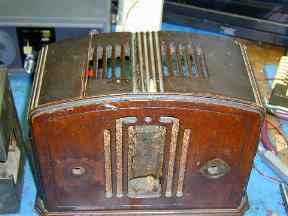
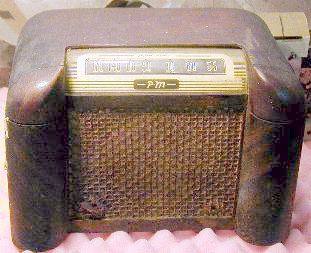
Another great set I couldn't ignore. I don't know the model name or number. Please help me and e-mail if you know anything about this set! It looks like an early 30's. The set has no permanent damage. It needs to be refinished, and it needs a knob. DO YOU HAVE ONE?
06/21/00
I took it apart and found it to be complete! And it works, I had to replace the line cord though. I also found a hole burnt into the dial . I filled and repaired the hole as best as I can. It didn't come out to good, I didn't think it would anyway. I used a piece of clear plastic glued to the back. I filled the hole with paint I had to mix for the proper color. It did the job, but it looks OK! I'm going to go with it anyway.
12/21/00
SORRY for the big delay, personal life, a couple deaths in the family a new job and more, more, more put me behind a bit! With all this put aside, I have been working on this set. I got it completely stripped sanded, and all the loose parts have been glued. Take a look below.
I will have paint the inside parts of the dial face and the footing of this radio black, as it was before. (See the first picture). Also I have to repair one small piece of missing veneer on the side of this set, as you can see below. You can also see I found a piece that is almost an exact match. As you see it I scraped some of the finish from the new piece to make sure the match was good. Once the piece is glued and dry, I will trim it, then sand the area. This will make look as if it was always there. WELL VERY CLOSE ANYWAY!
01/19/01
Well!!! The case is GREAT! The one big flaw with this is the dial scale. Someone put the wrong bulb in it and burnt a hole through the plastic. I tried to repair it, however it didn't come out to good. And the plastic face plate is a bit foggy. I didn't know how to take care of that problem. DO YOU? Please let me know. The veneer repair is the best I have ever seen or done. Like I said the case came out excellent. I am also still missing the knob. Please take a look at the picture below and LET ME KNOW if you have one. Anyway, as you can see I finished up the radio, and the knobs. I put on a few coats of varnish, and she looks very good. Not much more I can do. I hope to find another junker set just like it. Check out the pictures below and let me know!!!! Thanks!

10/18/06
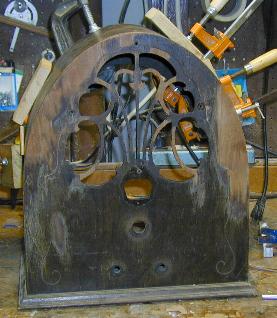
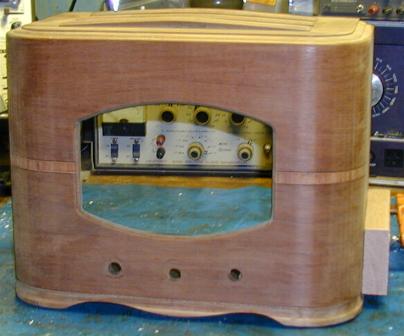
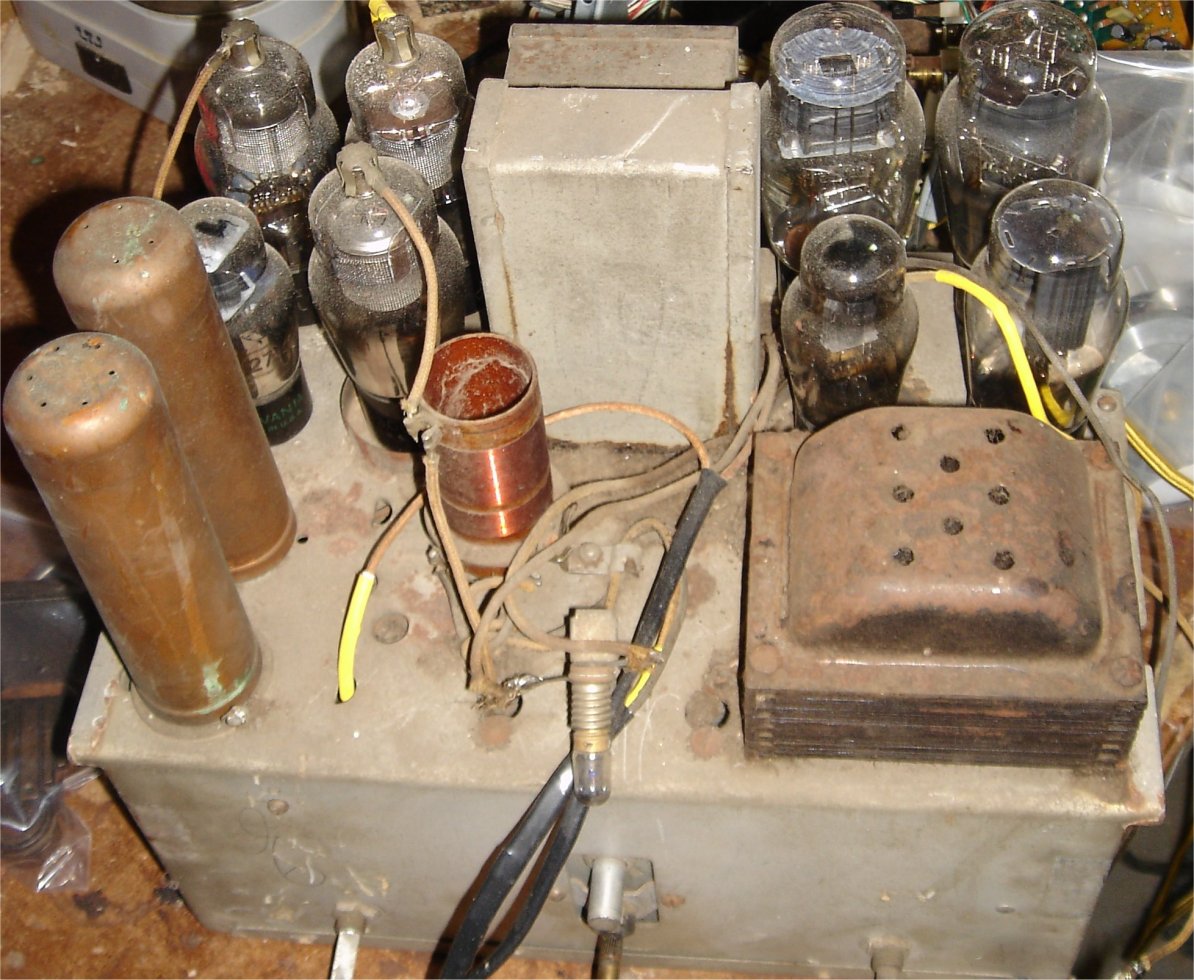
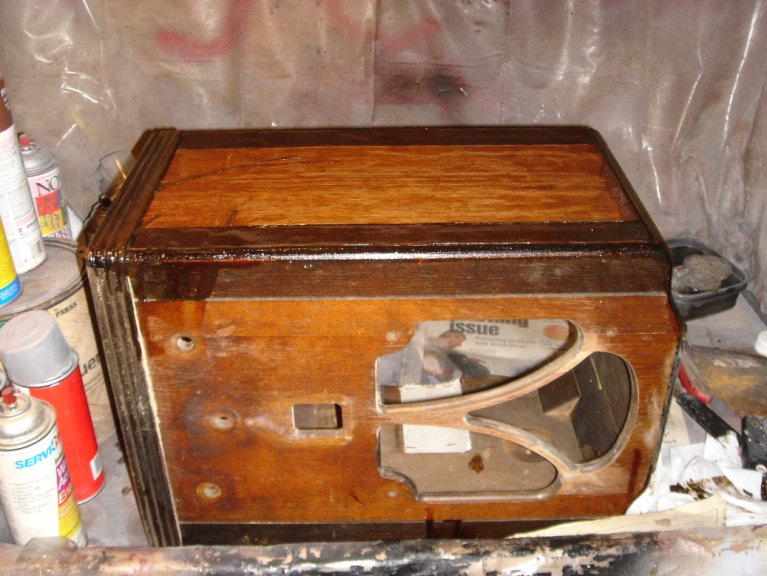
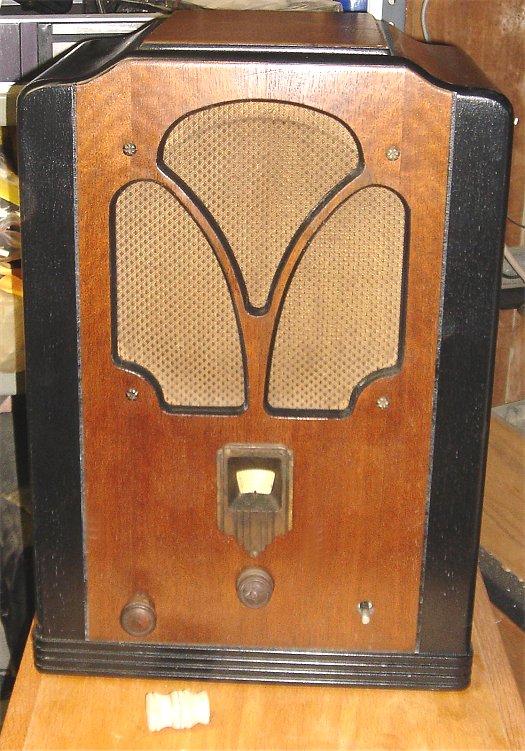
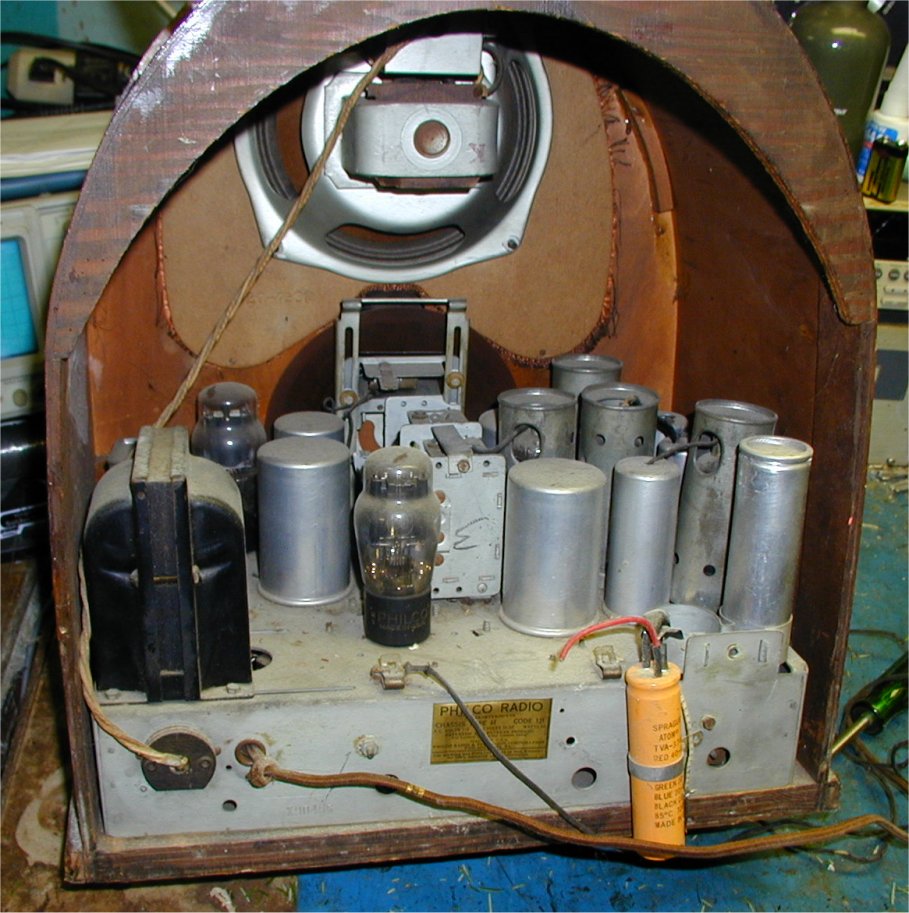
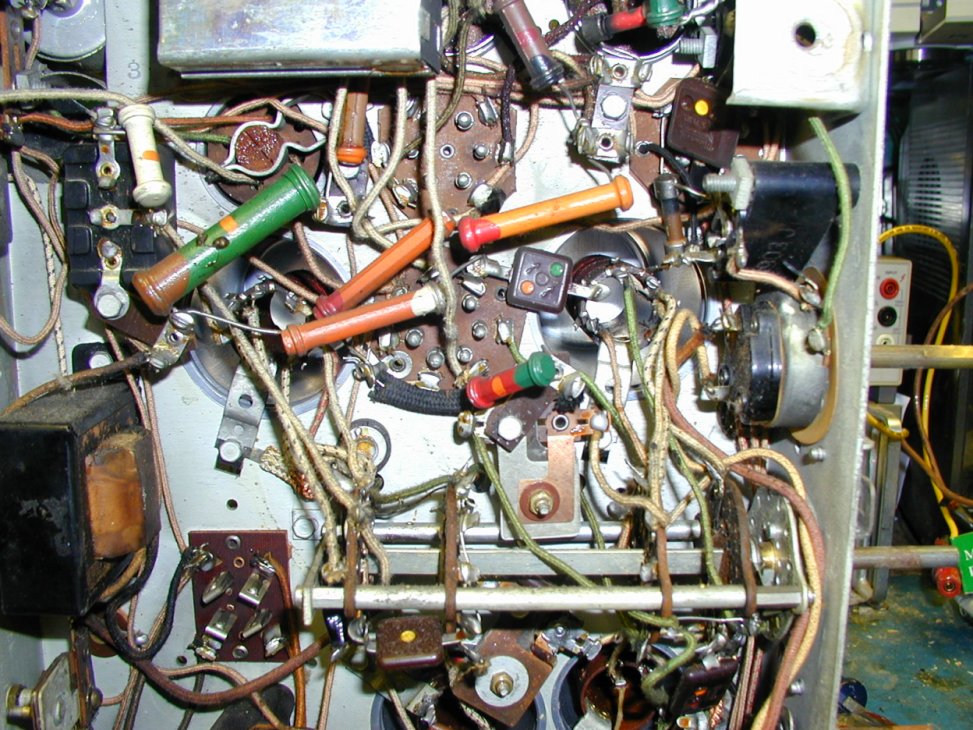
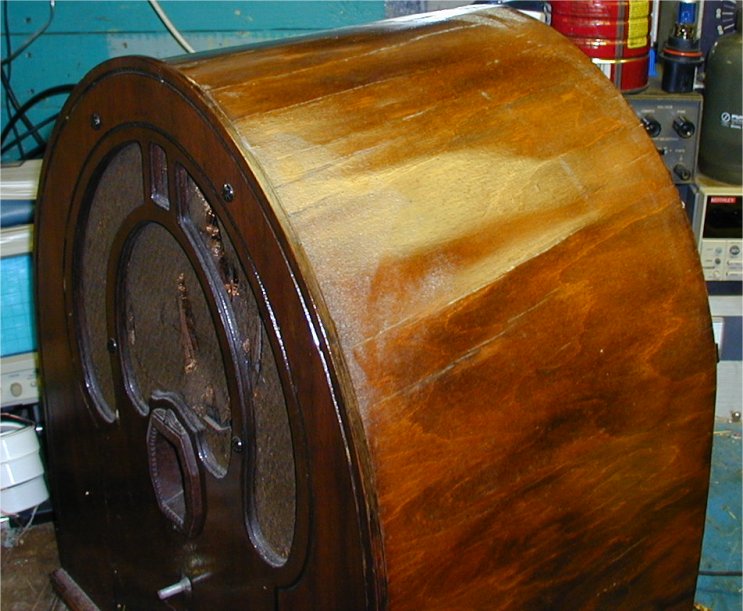
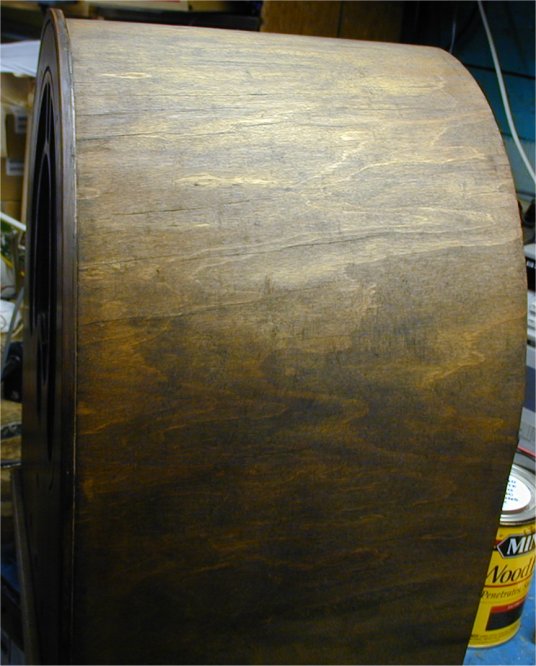
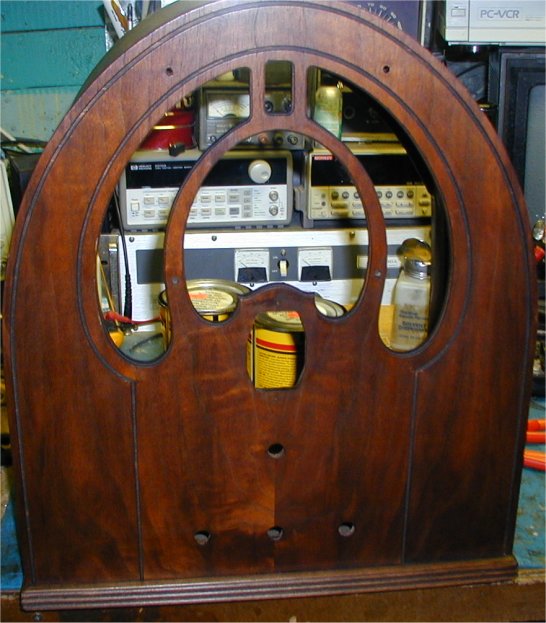
Got a nice early set from 1930. A very nice tombstone. The veneer is lifted all over. Since it was on display at a local auction the front speaker grille has been picked at and damaged from everyone that had to touch the broken parts. The top has a couple gouges. That's about it! A lot of hard work and very time consuming to repair the veneer. I will start as always by gutting it first. This has a nice 8 tube chassis with the copper capacitors. Some wire wrought, but complete. We are off to a good start. OFF TO THE CHASSIS.............................................
10/22/06
We didn't replaced all the caps, except the electrolytics. As always I insist on using the capacitors I sell. This helps me evaluate and test my own stock. I left in the copper ones though. They aren't connected, but the chassis looks much better with them in there. I used the axials I sell under the chassis. This will help the performance and keep the original look. As you know by now i'm not one of those guys that needs to gut the chassis to grind and polish everything. I will clean it up and pretty much leave it as original. That is the goal here. To make this look and feel like it did in 1930. I do have to rebuild the wires to the tubes on top. Not to toughf though. We just need to remove the metal cans exposing the coils and the other end of the wire. The speaker is perfect and works. All I need now is to replace a couple weak tubes and were off and running. BUT now the hard part.
02/22/07
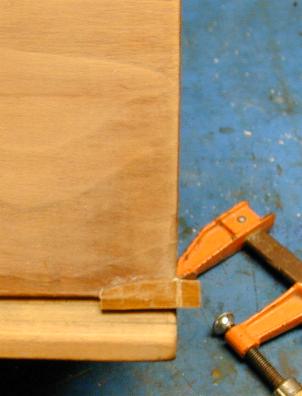
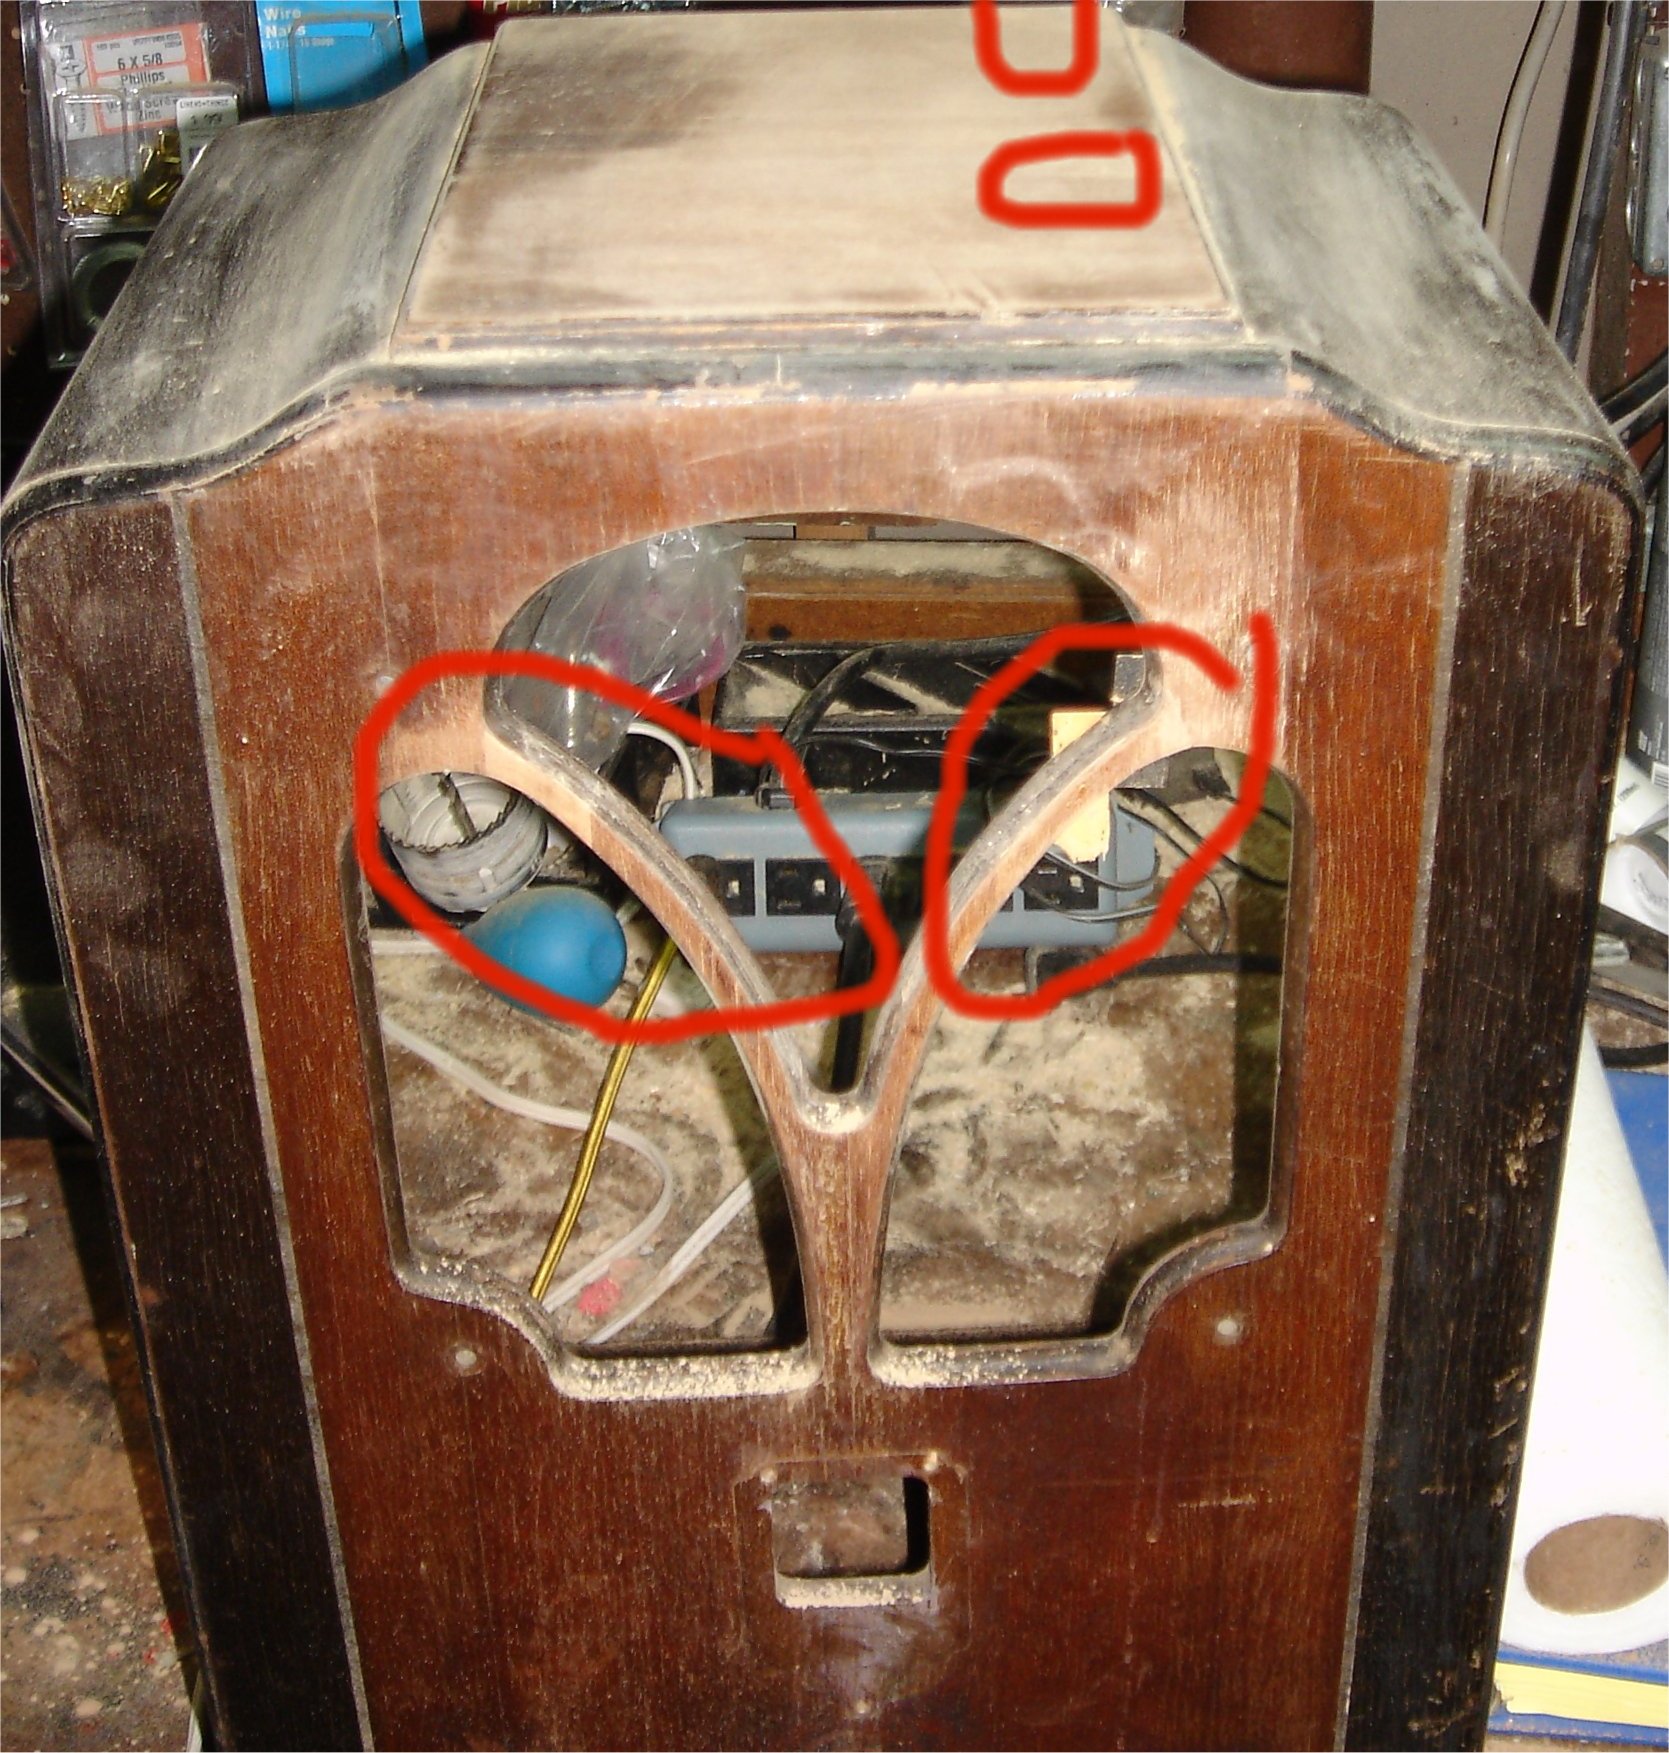
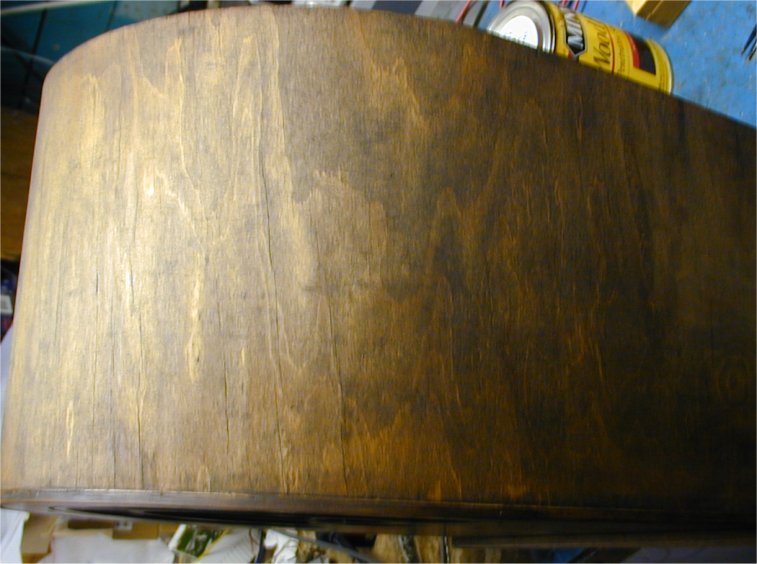
Been a while, but I have been working on this radio. I didn't get a picture before I tore it apart. I thought I did, but..........................Old age I guess. Anyway you can see where I had to rebuild the speaker grille. I circled the two sections in red. Keep in mind there was little to nothing there to start with. I had to imitate the good sections. As you can see the veneer looks pretty good. This is untouched. All I did so far was repair and sand in place. We have lots more to do. I need to make sure the stain covers all the veneer equally. Remember when replacing the veneer to begin with you want to match it up from the start. You need to try and match the color as well as the grain. This kind of repair is done in layers. Just like plywood. The last layer would be the veneer. In between there is lots of cutting and shaping, as well as gluing and clamping. In the end, again, more shaping and also some sanding.

03/19/07
I spent part of the weekend repairing the top. You can see where by the red circles. The repair nearer to the front was done using the bits and pieces from the rear repair. Once the veneer was in place I used an orbital sander to insure the top was completely flat. I didn't mention this, but I did have to lift and re-secure the top before the repairs were started. I think this radio sat in a humid environment for a long time. The markings in the front is an indent in the wood. It shows up because the original finish is still on the indented parts. this will come right out using a hot iron and a wet cloth. Once the original finish is gone you won't even know it was there.
03/21/07
I did finish up the indented section on the top. A little more sanding, then off to the stripping. I will post a picture once it's ready for the stain.
03/25/07
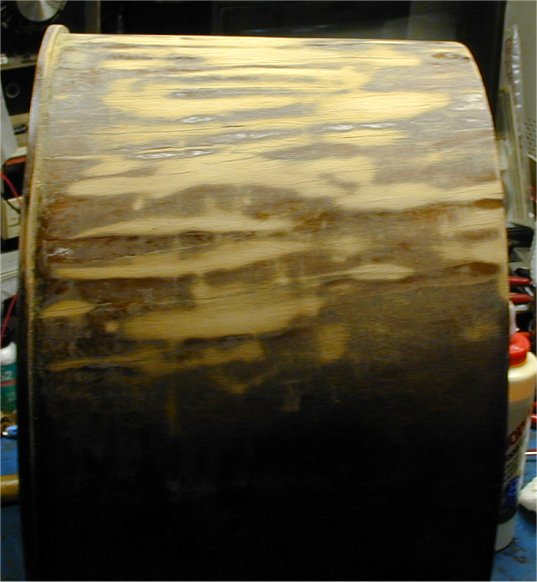
I did get to stripping over the weekend. During the initial strip i did find a couple spots where the veneer lifted. You have to go slow the first time around. There is always veneer lifting. Sometimes you can do more damage while stripping. I will repair as I go. Check out the photos below. I built a paint booth in the cellar near my workshop. Has worked great for many years. Above are two powerful fans sucking out the fumes. So I can strip and paint in the same space.
03/27/07
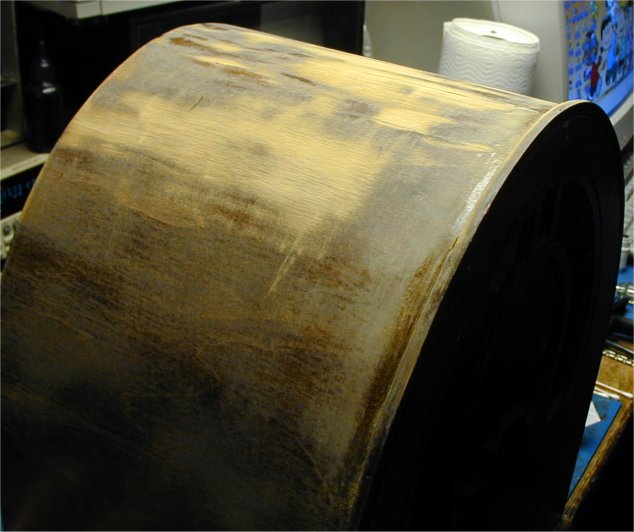
I finished the stripping. Remember this is done in multiple steps. There is the first strip: this will get the bulk of the original finish off. At this point you would use a scraper and a paste type of stripper. Then we have a second strip: this would remove most of what's left of the original finish. You would use the same paste type stripper and a scraper. By now you should be down to the wood. Use care with the scraper, because there may be loose veneer. The next step you want to use a liquid stripper and a #0 steel wool. Again use care, because the steel wool will catch parts of the veneer. It is good to find any and all of the loose veneer before you apply the finish. Just make sure you repair as you go. Dip the #0 steel wool into the liquid strip and go with the grain of the wood as if you were sanding. Work small areas at a time and wipe off the area with a paper towel. Keep doing this in every area until your done. The last step: The loose veneer problems should be over by now. So lets hope we found it all. Now you want to use the same liquid strip, but we want to use a #0000 steel wool. Again work a small part at a time. Always use fresh strip when going to the next area. Again towel as you go.
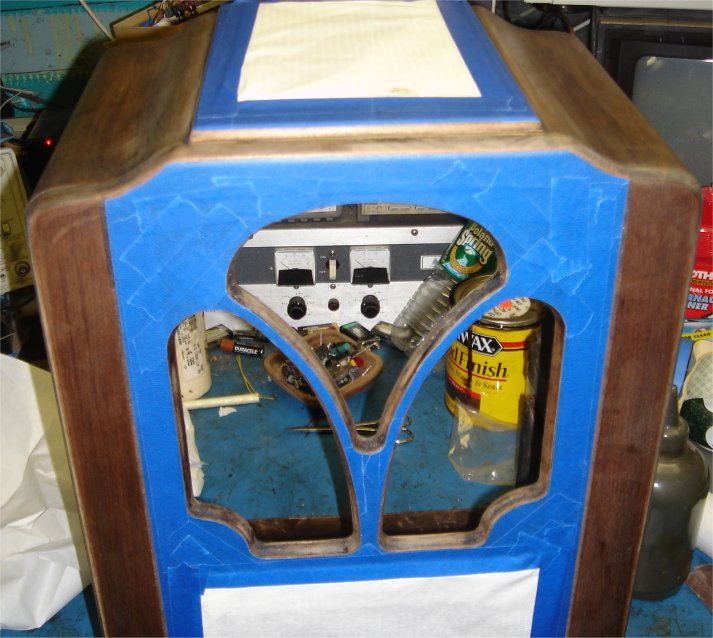
Once the the cabinet is completely stripped we want restore the black parts of the wood. Since this radio had lots of black painted areas as well as veneer I have to tape up the parts I don't want painted. You should use the blue painters tape. I have used others in the past. It's ok to use regular masking tape if you are going to paint right away. One problem though! The regular masking tape can damage loose veneer when removing it. Also it doesn't covet the edges as well. Your end results will be better with the blue tape, and easier to use. I will use regular flat black spray paint. Remember your going to cover it with a clear lacquer. Below are a couple more action shots during the taping and spraying steps.
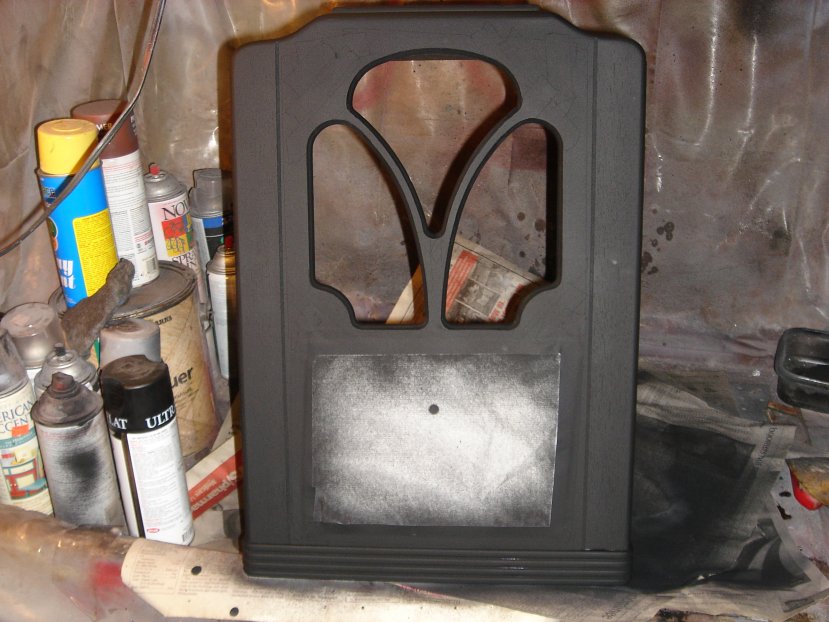
03/28/07
OK! Take a look at the picture below. This is the first coat of lacquer. The will be few more coats soon enough. A HINT: I have used many products. The best I have ever found is this Dutch Boy brand. I don't get paid to say this. Just wanted to pass on some good information. Don't buy cheap lacquer spray paint. Don't buy any paint from chain stores. Even the brand names chain stores carry are watered down versions of the originals. It's called profit! If you want the good stuff go to a paint store.
03/30/07
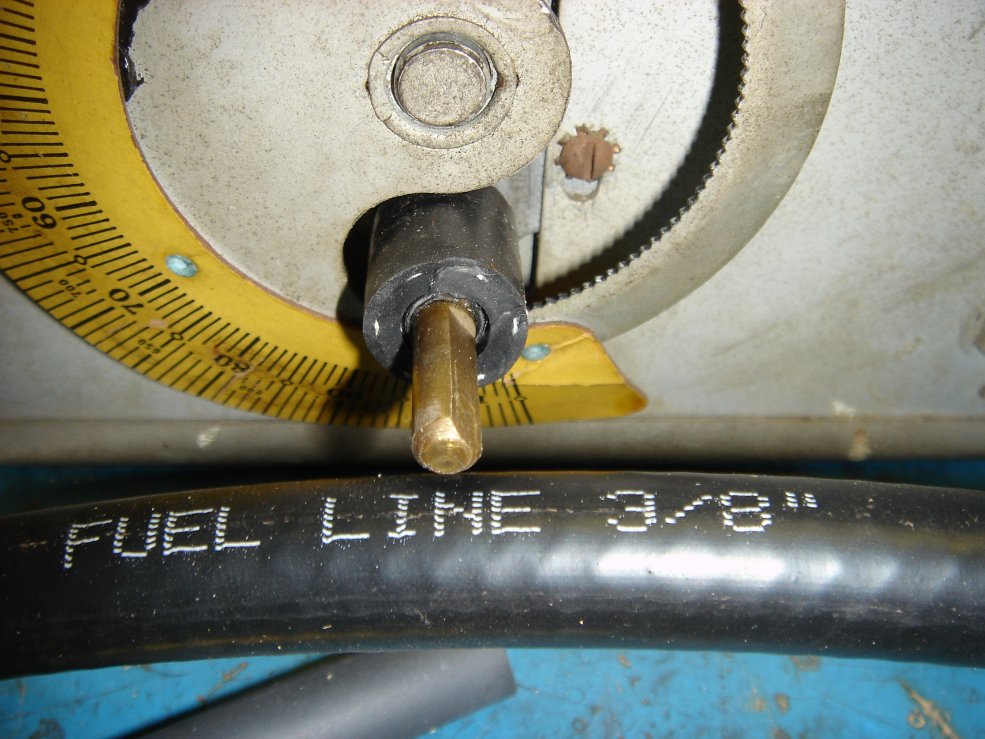
While waiting for the first coat to dry, I decided to rebuild the tuner control. Like many early thirties radios, most rubber parts have disintegrated, or hardened. Many of these sets used some type of rubber to move the dial scale. This radio is no exception. I use automotive hoses to repair them as you can see below. Just go to any automotive parts store and buy a foot of various size rubber hoses. All under 3/4 of an inch of course. For this radio I had to use a piece of Meltable wall heat shrink first because the inside diameter of the hose was a little bigger than the shaft. Meltable wall works great because it glues itself to the shaft. Then I cut a piece of the automotive hose and slid that over the heat shrink. There has to be a tight fit so nothing slips later. Then you align the dial scale and tighten the scale in place. THAT'S IT. It's just a matter of fitting in the correct diameter to the shaft and the tuning scale. One other note. I also cleaned the paper dial scale, and painted it with clear lacquer. This will protect it even more. I was lucky to get a good dial scale with the set.
04/04/07
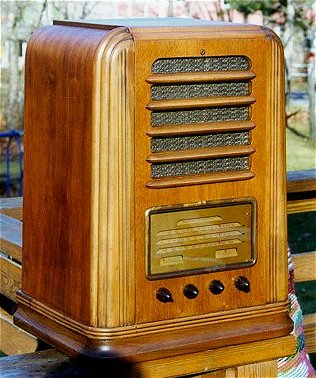
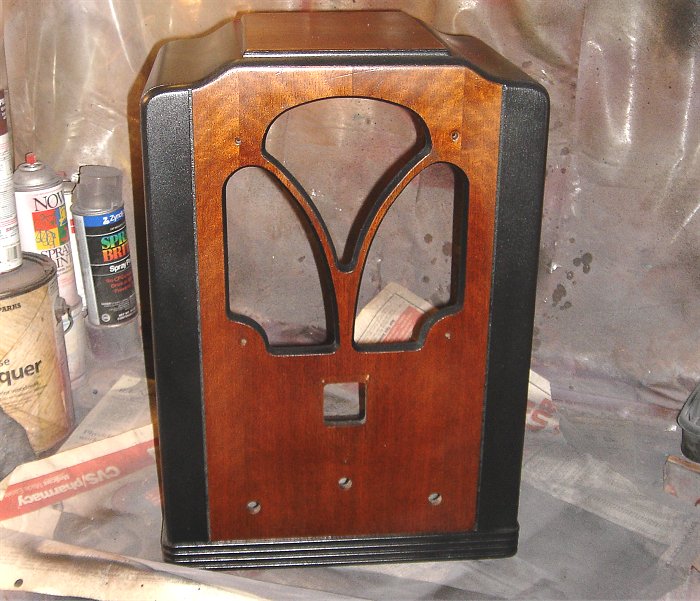
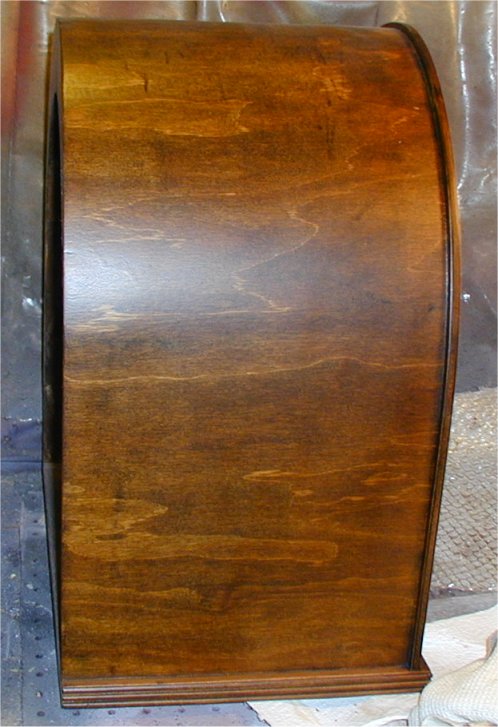
I did get to finish the wood with three coats of lacquer. I have to lightly;y sand in between coats. The last coat is sanded with a super fine paper. Then I buff it with a cutting paste. You can get it at any body shop. It would be used to buff out clear coat. After that you want to wax it. I use Mothers car wax. The picture below shows it as it looks today. The chassis, speaker, and grille cloth are all installed and working. AHH, what about the knobs? Well that's another story.
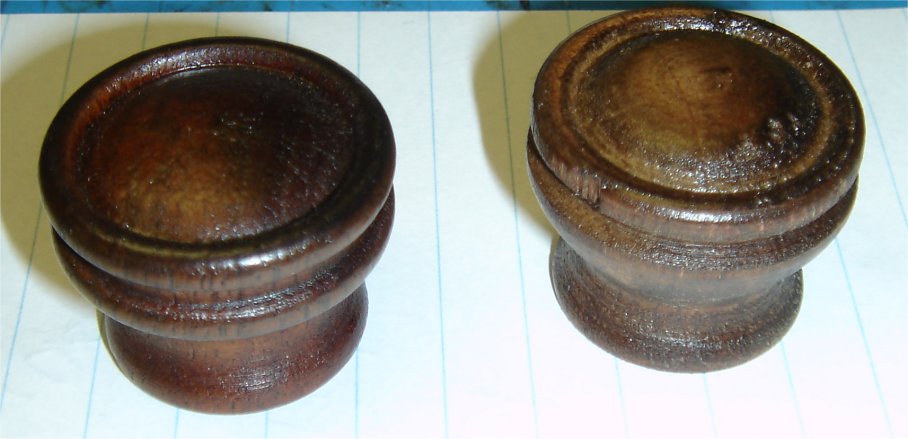
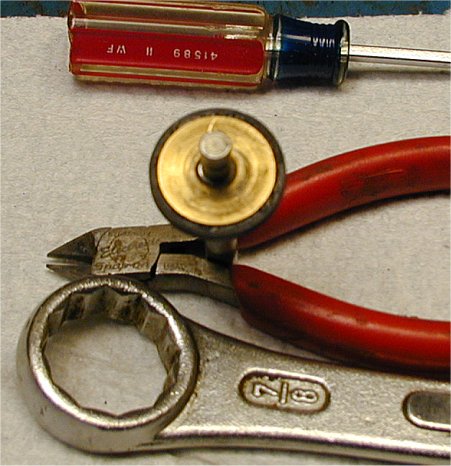
The set came with two wooden knobs. Should have three. One of two I did get isn't an original. I had to order a special tool for my lathe, and it came in yesterday. I did start cutting the knob, as you can see in the photo below. I will work on that this weekend and update ASAP.
08/02/07
I finally got to the knob. Actually I did this a month ago. I just got to listing it here now. Been a good summer and been very busy. As you can see it the photo above the beginnings of a knob laying in front of the radio. In the photo below is the finished product. Bet you can't tell me which one is the original. There is one more step. This need a brass insert and set screw so it can be fastened to the shaft. Other than that it is ready to go very soon.
03/20/06
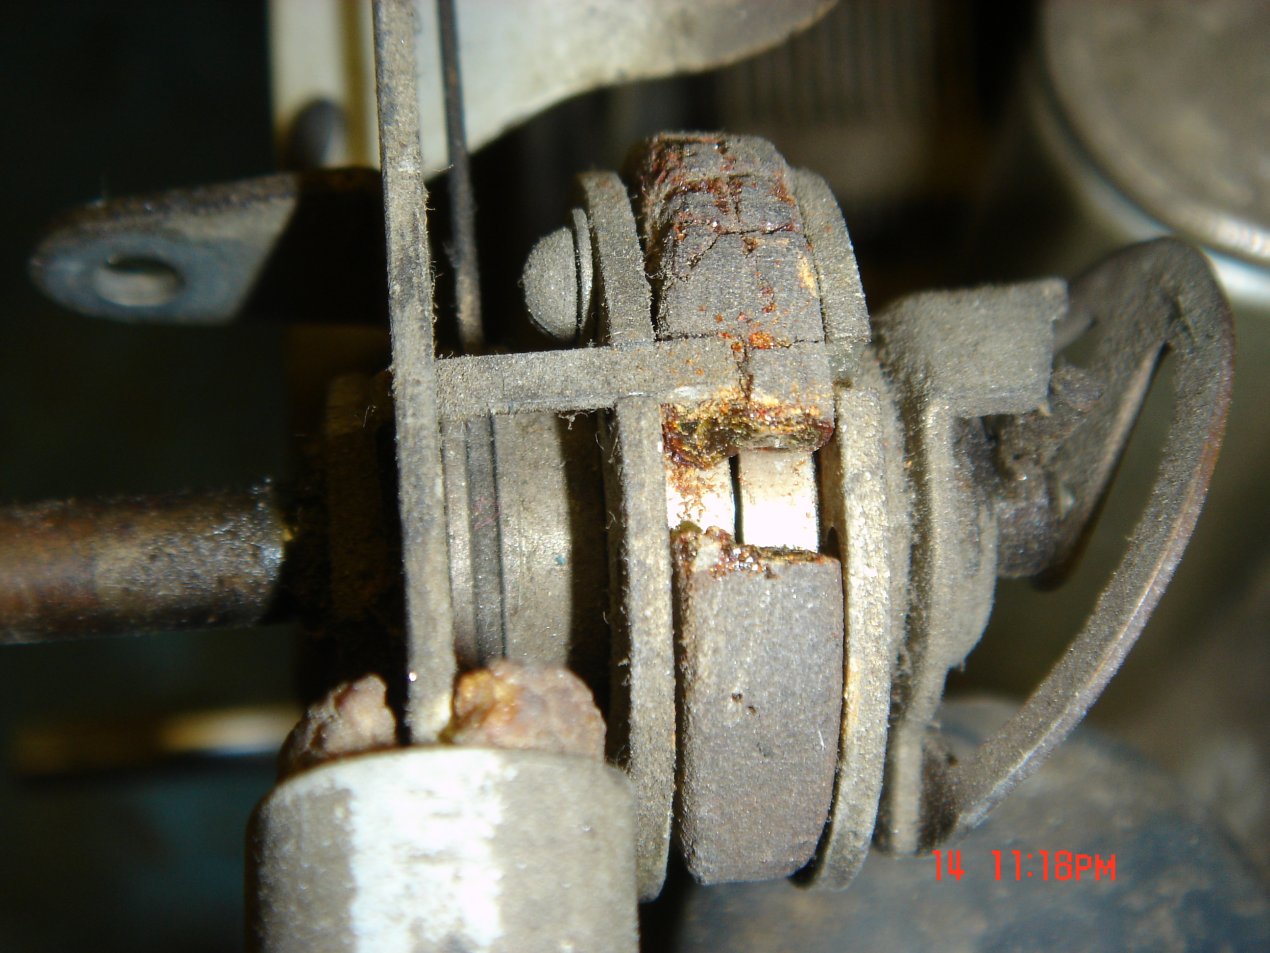
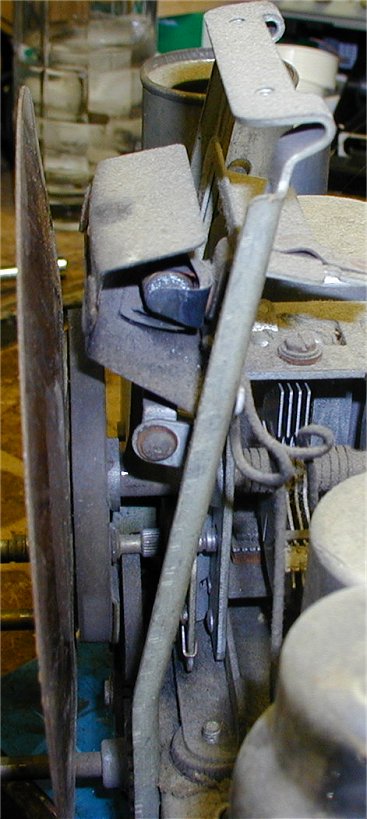
This is another radio with a challenging tuning knob rebuild. This, open coils, and open transformers is what you get when you buy at the radio shows. Not bad for myself because I can improvise, but just be warned! This is one of those sets with the tuning rebuild challenge! BUT it is a beauty and cost me only $18.00, So no complaints here. The knob has a two stage mechanical pulley system. Needless to say all the rubber is rotted and breaking away. Also all the rubber in the tuning float system needs to be replaced.That means the tuner and the pointer system. Take a good look at the upper right in the picture below. You can see the tuning knob and the rotted rubber to the right.
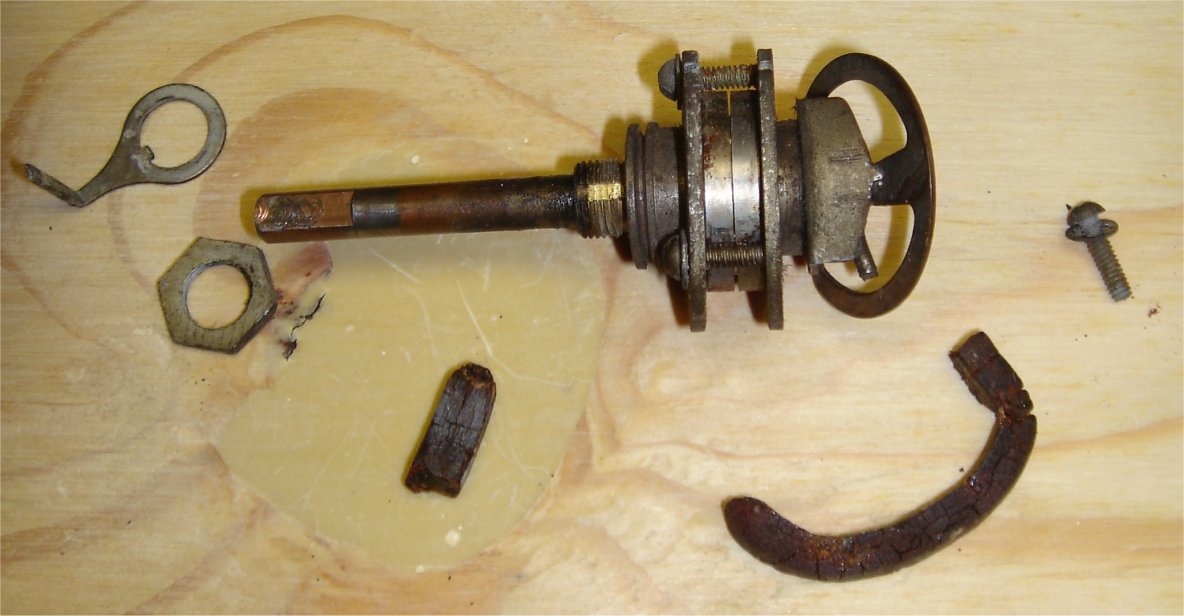
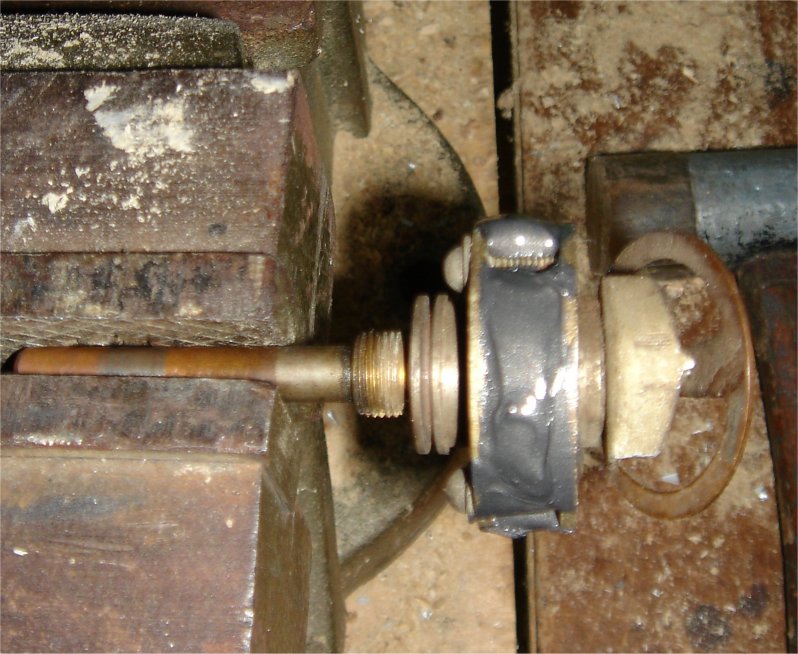
I need to remove the tuning knob and rebuild it. The three pictures below pretty much sums it up. First problem was removing the tuning knob with out removing the dial string. I used a wire tie and tied the string in place before removing the knob. Once the tuning knob is removed I have to take it apart, and clean out the bad rubber. While it was apart I added some grease to the bearings inside, then assembled it. Next I used a high strength automotive RTV and formed my own rubber using the knob itself as a mold. See the third picture below. Once dried you need to adjust the three screws, oil the shaft and adjust the tension spring at the rear of the tuning knob.
04/11/06
We can't install the knob yet. Next we need to replace the four rubber bushings for mounting the tuner. This can be tricky because your dealing with two sides of the chassis, screws, nuts, washers and a sleeve. The best way to do this is one at a time. Remove the hardware remove what's left of the old bushing and replace it. I use simple rubber wire grommets found at any Ace hardware store in those hardware trays. You will need eight of them. Match the size with the sleeve. Use one on each side. Insert the sleeve into one of the grommets before use install it. Once this is done there is one more rubber part. At the very end of the tuning scale is a rubber piece that needs to be removed. I used the same RTV there as well. You could use a softer type but I already have this one, and it works good enough. Just make sure the metal part of the dial scale is centered as it dries. Now I have a very precise and smooth tuner. This will bring me to the chassis. Lets see what's wrong and get this working.
04/13/06
This doesn't work at all. I had to replace the cord first. I used the brown rayon cloth covered wire I sell. I didn't try to power it though. I just replaced the cord and all the caps. Yes, I used my stock of capacitors. How many retailers of capacitors can tell you they use their own parts? I then tested all the tubes. I don't always, but this type of chassis wasn't known for having the best tubes. I was right too! The 6H6 is bad, and the 6SJ7 is very weak. I have to buy the 6H6.
04/20/06
I bought 8 of them NOS from Ebay because they were a great deal. Now I can tell you the radio works great. Of course I have to make all the adjustments, alignments.
04/25/06
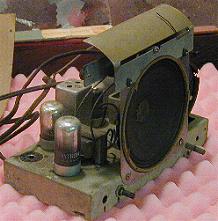
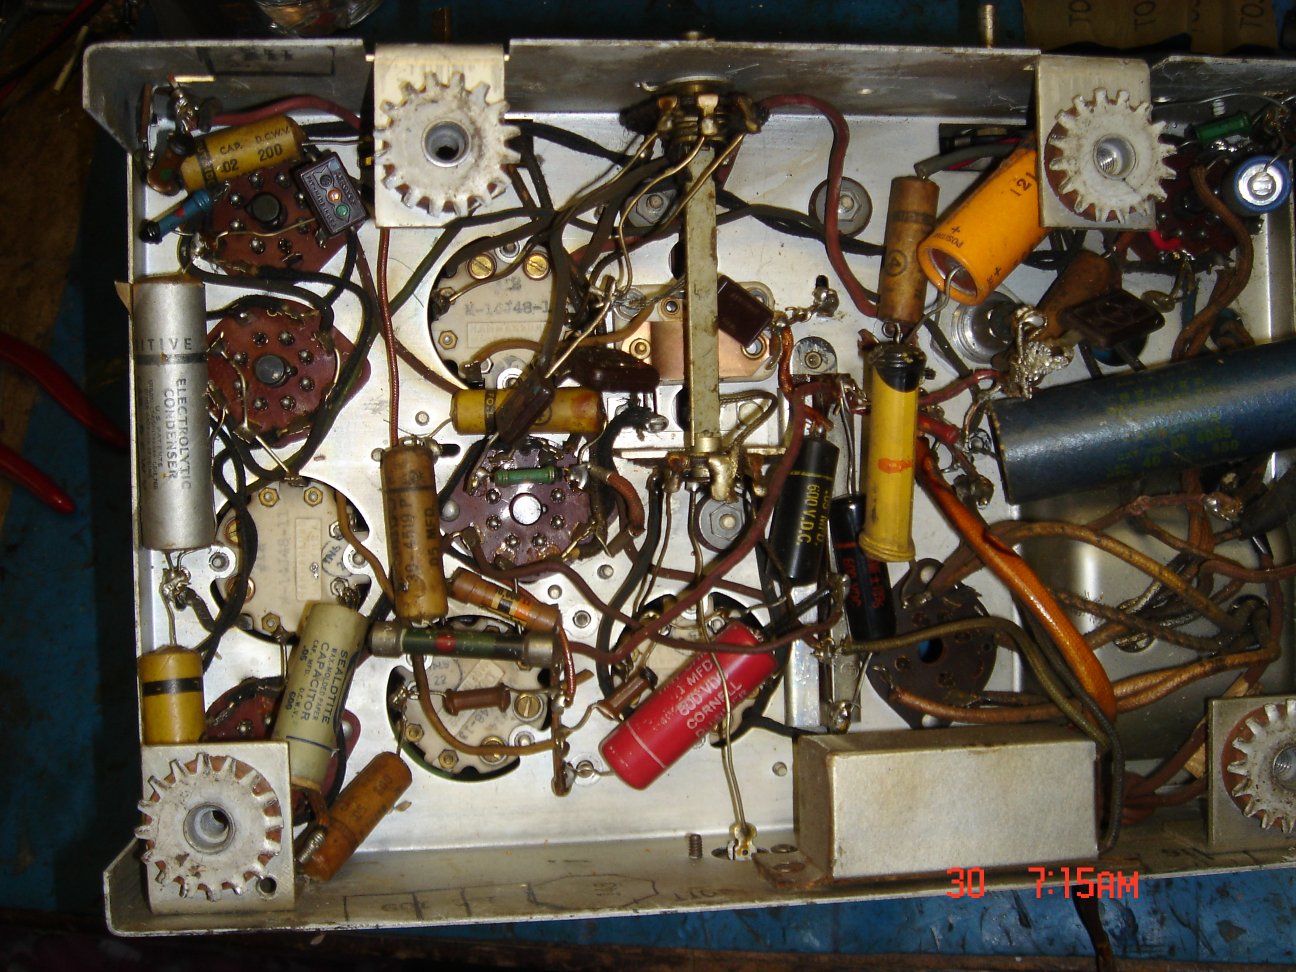
The chassis and the speaker are good as well as the tuning. Pretty good sound too! The case had no damage. it just needed to be refinished. So I have no information for this set while restoring the case. The pictures below are chassis shots from underneath then the rear top. This was before I replaced all the caps.
05/04/06
Sorry no before photo. Couldn't't find it. This is it though. The black parts are original. So is the grill cloth!
11/20/04
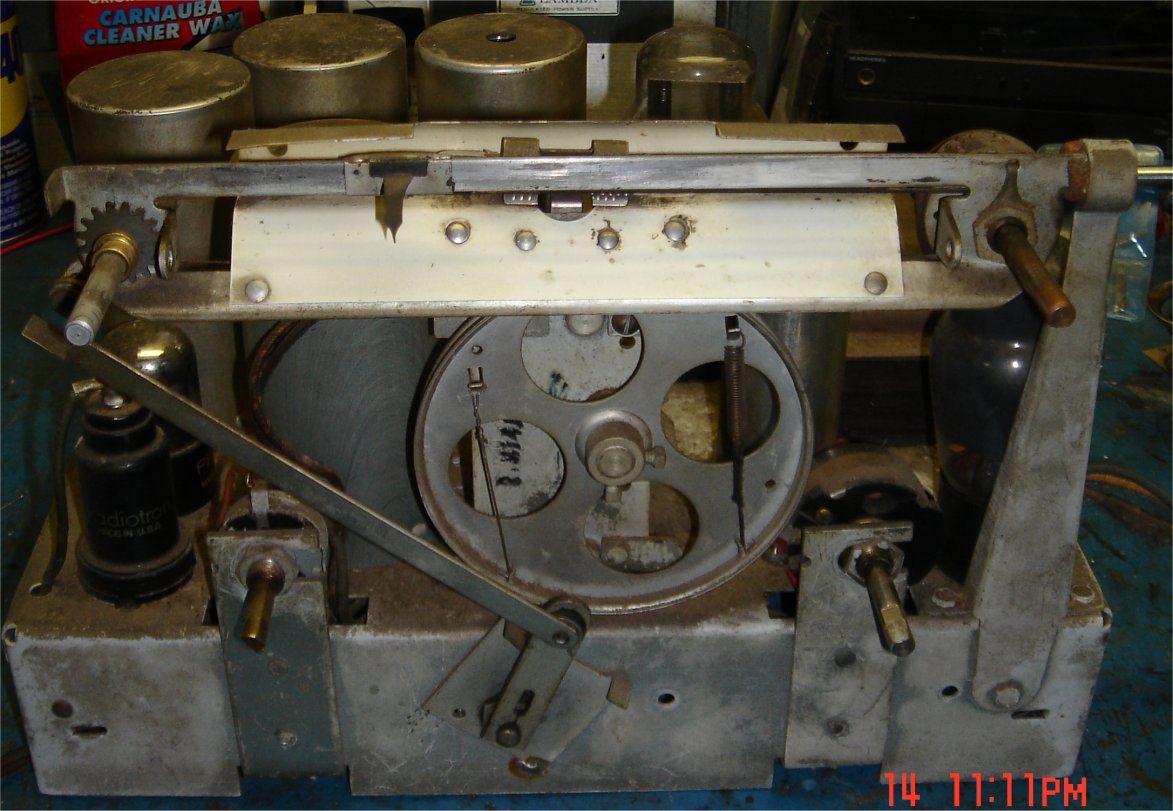
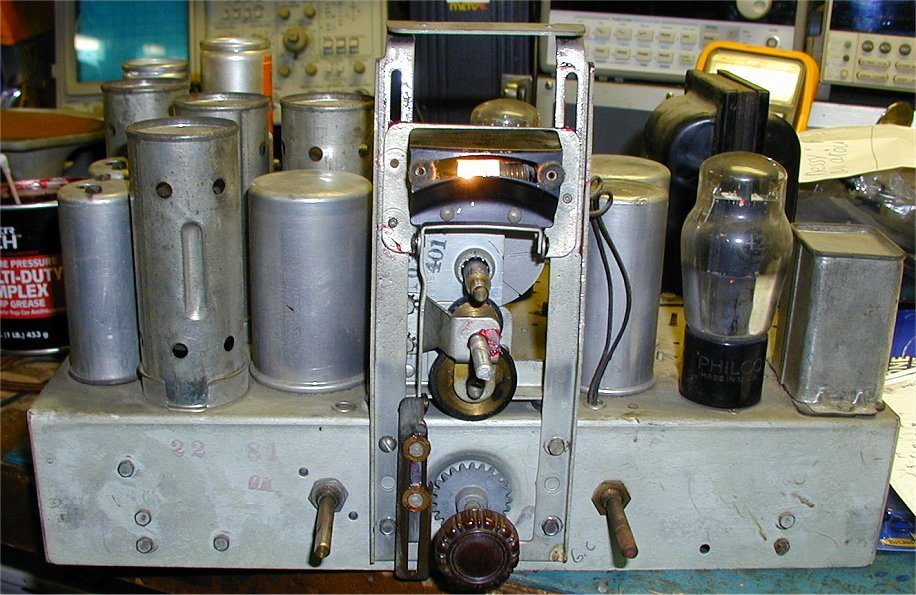
First Eval: The tuner is stuck and looks pretty complex. It uses rubber wheels and gears, and has a mechanical dial lamp assembly that lights up only the part of the dial scale you need to see on each band. A nice set up though, but adds to the complexity. I will have to remove all the works including the dial scale wheels and dial lamp assembly in order to repair the tuner mechanism. I will also have to replace all the dampeners mounted to the tuning cap. They are dry and breaking apart.
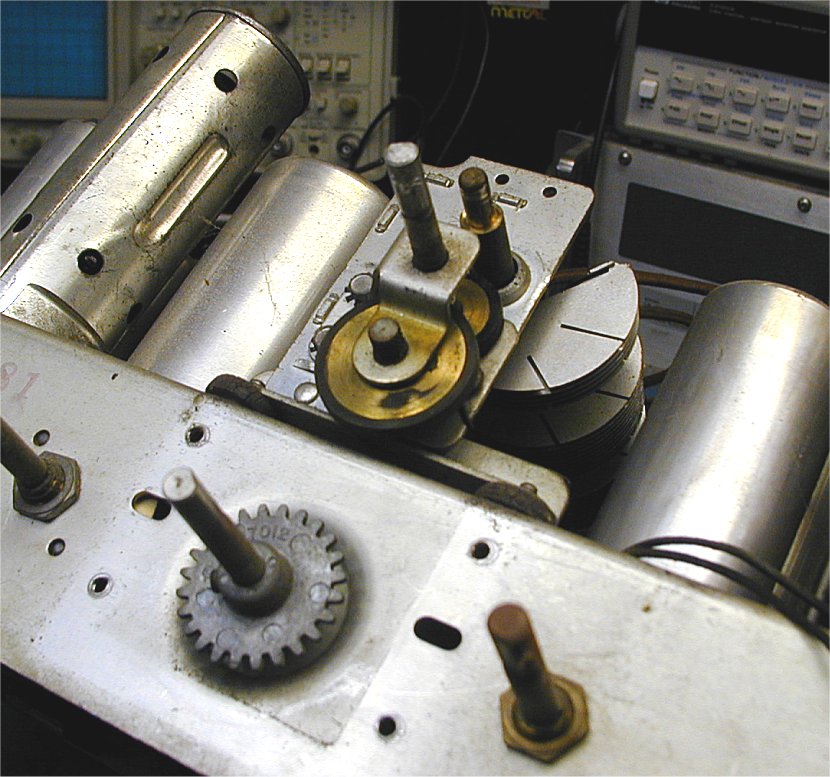
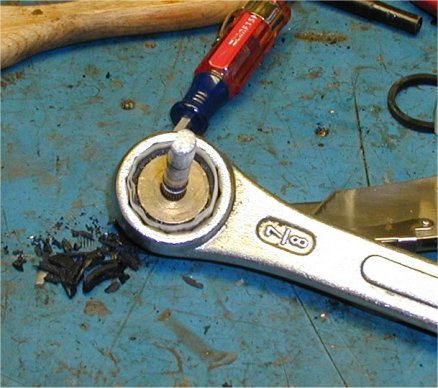
OK! Now that we have the dial scale removed we can see most of the tuning wheels. They are dry and slipping. I will have to remove all of it and rebuild the wheels. I used to repair VCR's so I have hundreds of VCR belts. Find a match and with some RTV adhesive you got a new rubber wheel. Works great too. Some cleaning and grease we got a whole new assembly. The rubber on the dial scale is good but worn and flat in a couple spots. I will use some RTV adhesive and a flat belt to repair that. The most important thing about repairing round rubber wheels is to have a form. You want to make sure it stays round while curing. Look at the picture below. I used a wrench, but use your imagination. It needs to fit snug so even pressure is held on all sides. I had to use a little scotch tape as a shimmy, but as you can see it came out perfect and works just as good! In the first picture you can see some of the old rubber I had to remove.
11/27/04
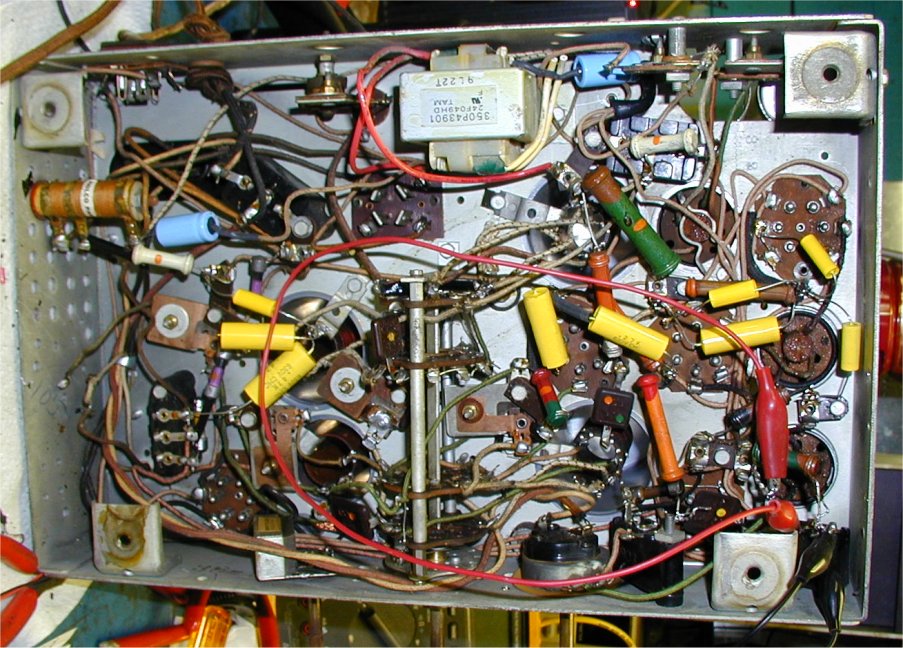
OFF TO THE CHASSIS: First thing to do is repair what others thought was a repair. Parts hanging on by wires are not repairs. You can see the orange cap hanging off the back! They also removed the original cap. There should be two side by side. I have an original so I will install it, just for looks! I won't connect it though. I will use new capacitors in place. The schematics call for a double 8mf 450 volt capacitor. I will use two of my own custom 8mf 450 volt capacitors. They are very small and will fit under the chassis.
11/28/04
Well I replaced the caps, and checked out the rest of the set for apparent damage. I didn't see any, so I will power it up for the first time. I will use a variable transformer tied to an isolation transformer, and set the voltage at about 90. Then I will measure the voltage at the transformer first. The transformer output is measuring about 550 volts AC, and the DC side is measuring about 350 volts. Also the dial lamp works! I will replace it anyway. I have about 25,000 of them in stock if you should need any go here "www.wjoe.com/diallamps.htm". Anyway, so far I can tell the 80 tube is good and the power transformer is good. I also know there aren't any shorts to ground. I can now go to full power at 120 volts. BUT, nothing! No output ,no noise, no hums. On a normal day I would say the high voltage supply was not working, but I know it is! I will poke around with my signal tracer and see if I get anything there. It could also be an open coil. I did get this at a show for a great price. Those guys always sell the junk they cant fix. That means open coils, or a bad parts they can't find anymore.
11/30/04
I put a couple hours into this only to find that there is a third supply that isn't working. Although it was staring right at me I never thought to even check it. Well guess what? It isn't working! With in a few strokes of my volt meter I found an open chock......or coil...........depends how you look at it. I won't find an exact replacement, and I don't need one. I know from the schematic the impedance is about 1700 ohm, or 1.7K. I did find a transformer with a winding close to 1500 ohms and with the same footprint. I will use it and I will replace the capacitor that was connected to it.
WOW! Now were are cooking with gas. The voltage is where it should be and the radio has life. However, all it does now is make a loud grinding noise that comes and goes. I found by tapping on one of the capacitor banks it got louder and stronger. No doubt that cap bank needs to be replaced. There are six caps in this one. I will replace them all with regular axials and save the original can to rebuild later for the next set. You can see the new choke in the second picture below. Top dead center. On the right you can see the six caps I installed. In the first photo, on the left you can see the old choke and part of the original cap bank on the top. You will also notice I found a few more caps to replace. These were replaced to enhance the sets performance. And it did! Works great now. Nice sound too, with good bass response. I also rebuilt one of the bakelite cap banks too. It doesn't seem to need anything else electrically. I did a four hour run test, and all looks good!
12/03/04
Now to reinstall all the rebuilt tuner parts. The new rubber works great! I grease and oiled everything that needed it and now we have smooth tuner. I have to replace the grommets though under the tuning cap. It flop around and feels cheap. I found the perfect replacement at the hardware store. These are your everyday rubber grommets used for metal chassis to guard wire from getting cut. You need to use two for every mounting screw. Not to easy because you need to line up a lower and upper grommets, the screw, a washer, and the tuner at the same time. Also two of the screws were soldered. So that has to be removed before the screw. In the picture below you can see the new tuning components. All working free and smooth.
12/04/04
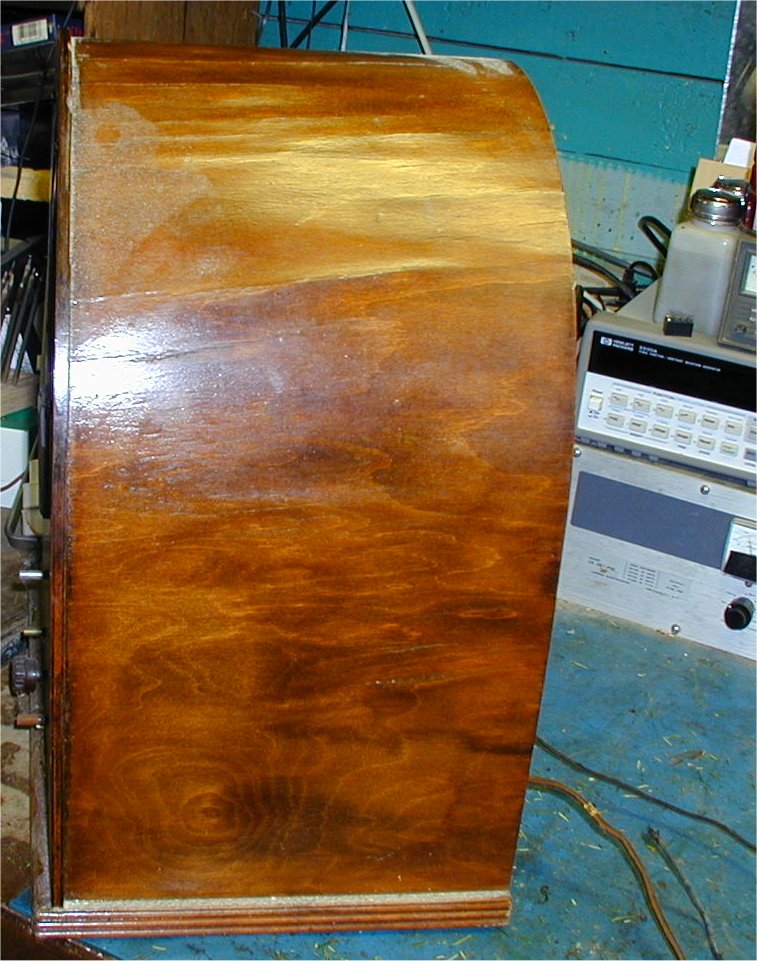
OK, I got all the grommets in and they were a perfect fit. What a difference when handling the tuner. Now off to the case. It will need some of the veneer to be lifted clamped and glued all around. This will take a while since you have to do it in steps and wait 24 hours between them. Take a look at the photo below. You will see what I mean. The monkey before me figured they would make it shiny so they slopped on some high gloss.
12/18/04
Well! It took a while but all the bumps are gone! Wave after wave of them. A whole week of lifting gluing clamping section at a time, but I was able to save the original veneer. Take a look at the next photo and you will see for the most part the bumps are gone. Of course these now have to be sanded! So they are going to get worst before they get better. There is still some waves in there. They are just a lot better now.
12/22/04
OK take look at the new pictures! You can tell where the waves were. You do have to be careful here because you don't want to cut through the veneer. This is done in three steps. Well three grits of sandpaper. The first would be a 150 grit attached to a rubber sanding block. Use the flat side. This will get the bulk, but be careful! Keep in mind you will never get it perfect, but you can get it so close no one will notice. Next, after a careful inspection, use a 200 grit sandpaper. Again use a rubber sanding block, and use the flat side. This time sand a bit harder. This time your trying to level out the waves and smooth the wood. The next step would be a 220or 240 grit sandpaper, BUT use your hand not a block. This will do little with taking down the waves, but will smooth the wood quite a bit. While your doing this, you can feel for large bumps and/or parts you may have missed. Take a look below at the photo's.
12/30/05
The case still needed some cleaning up and some more sanding. This time it is selective depending on where and how much. Now we are ready for stain. But we have light spots now! If we just stained the whole set these light spot would show right through. What we need now is a very dark stain, a cloth towel, and q tips. We need to use the q tips and towel to spot stain and blend in to match the rest of the case. I will let it sit for 3-4 hours in heat, then wipe down again. If all looks OK, I will stain the whole case in the same dark stain. You must soak it then wipe off the access. Look at the pictures below. This is now ready for the first coat of finish. I will use lacquer in a spray can for this one.
01/02/05
We got the first coat of lacquer on and she looks good already. I will sand it with a 400 grit sand paper clean off the dust and go for a second coat. I will wait at least a day though. Check out pictures below. Looks nice, but not nearly done yet. In the second picture you can see the bumps are gone!!

01/04/05
Now she is ready for the second coat. Simple enough! The first picture shows the pay off for all the sanding and special staining. Both show the nice dark antique look coming along!! This will be sanded once again with a 400 grit, and a third coat. The important thing is to keep going until it looks right. The grain should be filled in by the third coat.

![]()
![]()
09/17/08